How to use fetch in React? Fetch data from APIs in React.js

We all know React makes it very easy to work with dynamic content in our application. We store some information in the database, and when we load our application, we fetch those details from the database and render them on the DOM.
When it comes to fetching data in React.js, there are a lot of different patterns we can follow. But which one to consider? That depends on the project’s scale. It may be necessary to use a more complex setup for a large project, whereas for a smaller project, a simpler approach may suffice.
This article will discuss a basic approach to properly fetch and display information from an API in a React.js based application.
Using the browser’s native fetch API
The fetch API is provided by the browsers, which provide an interface for fetching the resources across the network. It offers more features than the conventional XMLHttpRequest.
For this tutorial, we’ll use a fake REST API provided by jsonplaceholder.typicode.com. It provides a variety of fake REST APIs such as posts, photos, users, todos, etc. To keep things simple, we’ll go with the todos API.
We can access the API endpoint at: https://jsonplaceholder.typicode.com/todos.
On making a GET request to the above URL, we’ll get a list of todos as a response,
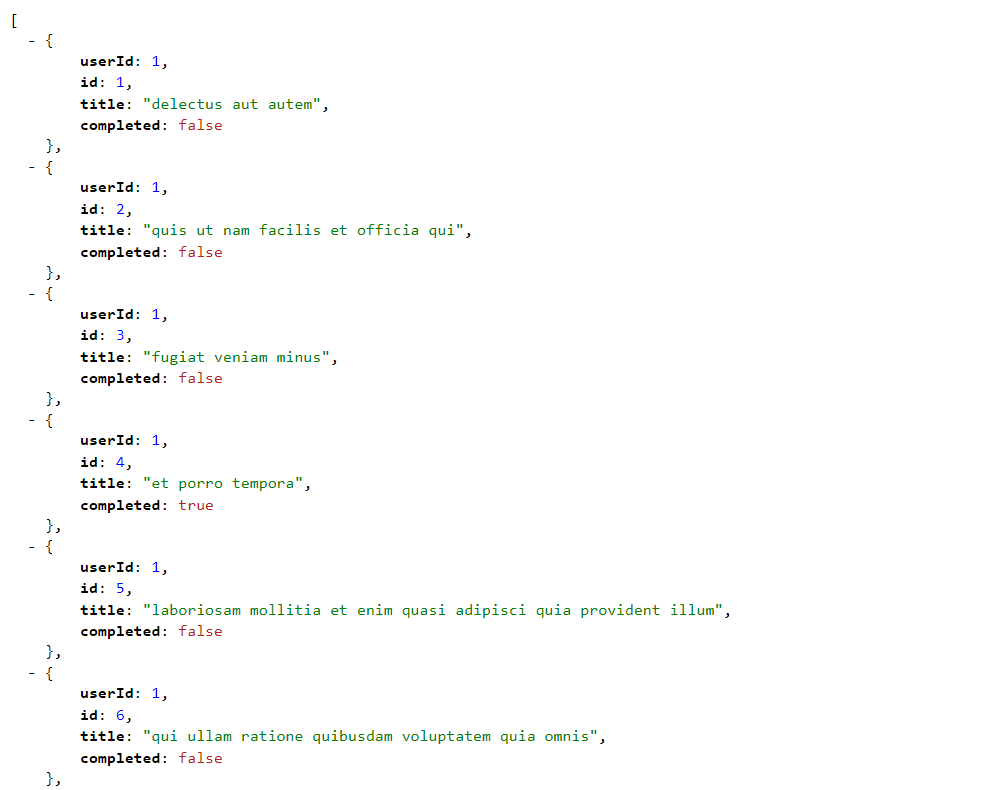
Each todo will have the following fields,
{
  userId: Number,      // The ID of the user who made the Todo
  id: Number,          // The ID of the Todo
  title: String,       // The title of the Todo
  completed: Boolean   // The status of the Todo
}Code language: JSON / JSON with Comments (json)
Now, to fetch all the todos to our React.js application, we’ll follow the given flow,
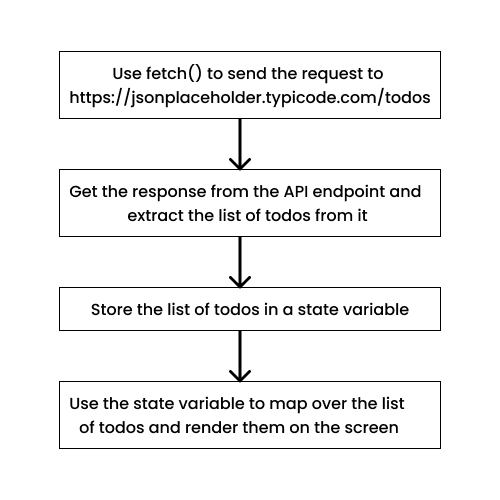
Using fetch() to send a request to the API endpoint
The fetch() API is natively supported by almost every browser nowadays (except for some older browsers). To send an HTTP request we simply use the fetch() function with the API endpoint URL as an argument. We receive a promise that resolves to the actual data from the API,
const response = await fetch('https://api.example.com');Code language: JavaScript (javascript)Optionally, we can pass a second argument that contains the options we might want while sending an HTTP request. For example, we can specify the HTTP method we are using,
const response = await fetch('https://api.example.com', {
  method: 'POST'  // Sending a POST request
});Code language: JavaScript (javascript)
Now, let’s write some code. Here, we have a simple React.js application with just one heading,
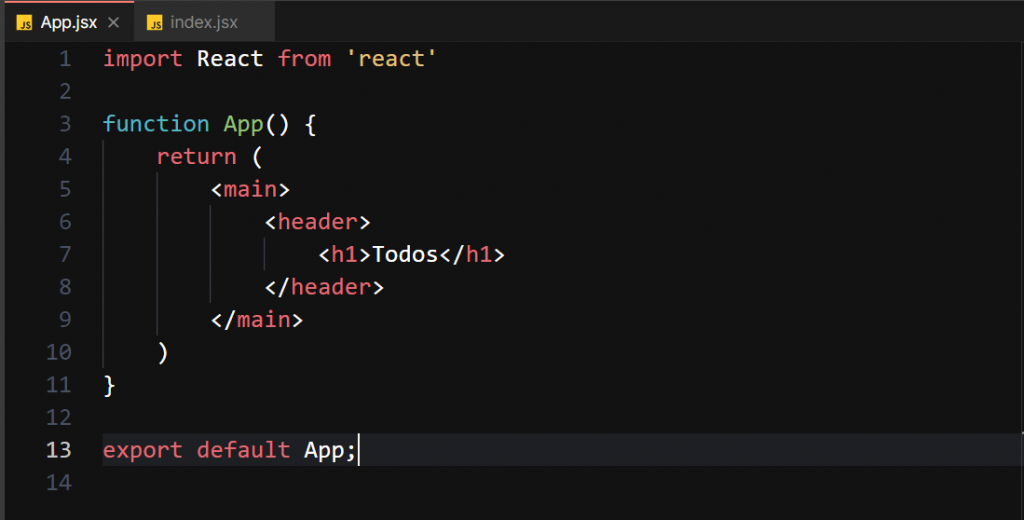
Now, we write an asynchronous function that fetches the list of todos from the API and logs the response,
const url = 'https://jsonplaceholder.typicode.com/todos';

const fetchTodos = async () => {
  try {
    const response = await fetch(url);
    console.log(response);
  } catch (error) {
    console.log(error);
  }
};Code language: JavaScript (javascript)
When we run the above function, we can see that we are getting some response from the API,

To get the desired data, i.e., the list of todos, we’ll parse the response and get the response body as JSON,
const url = 'https://jsonplaceholder.typicode.com/todos';

const fetchTodos = async () => {
  try {
    const response = await fetch(url);
    const data = await response.json();
    console.log(data);
  } catch (error) {
    console.log(error);
  }
};Code language: JavaScript (javascript)
Now, if we run the function, we can see the list of todos being logged,

Storing the list of todos in a state variable
Since we now have the data, let’s store it in a React.js state variable. We first create a state which initially contains an empty array,
const [todos, setTodos] = React.useState([]);Code language: JavaScript (javascript)Now, instead of logging the data, we’ll store it in our todos state,
const fetchTodos = async () => {
  try {
    const response = await fetch(url);
    const data = await response.json();
    setTodos(data);
  } catch (error) {
    console.log(error);
  }
};Code language: JavaScript (javascript)
Now, let’s log our state and see if everything works fine,
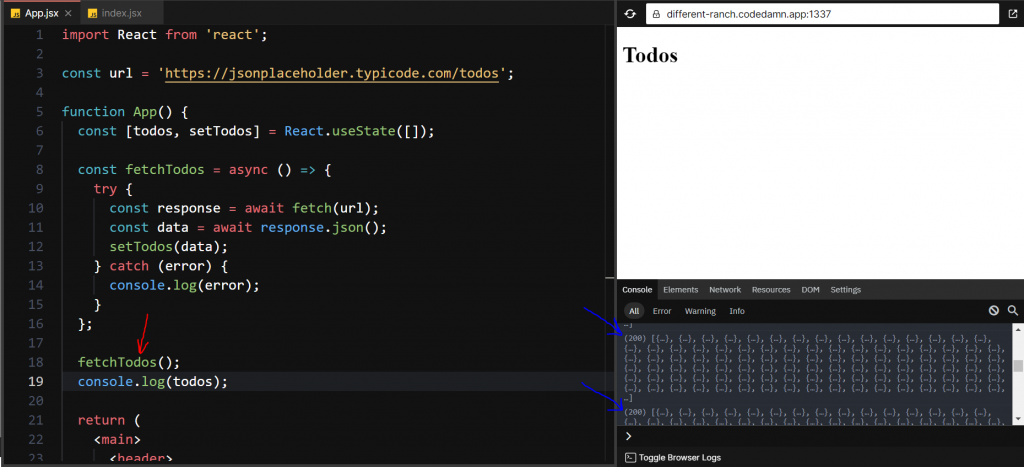
We can see the logs of our todos state variable. But if we notice carefully, we can observe that the logs keep coming. Also, if we inspect the network tab, we can see that we keep fetching from the API one after the other. This is a massive issue in our code.
But why is this happening?
The answer lies in the working of state variables in React.js. The component re-renders whenever there is a change in the state. In our case, every time we call the fetchTodos function, we change the state of the todos variable. As soon as we change the state of the todos variable, the component re-renders and calls the fetchTodos function again. Our application ends in an infinite loop of fetching the todos and updating the state.
How to solve this issue? We’ll use the useEffect() hook provided by React.js to solve this issue.
Using useEffect to prevent infinite re-render loop
The useEffect() hook is used to run a side-effect, every time the component’s state changes. It takes a callback function as its first argument. This callback function will get called when the state of the component is changed.
// Callback will be called on every re-render.

useEffect(() => {
  // Do something
})Code language: JavaScript (javascript)
Optionally, we can provide a dependency array as the second argument. The dependency array can be either empty or can contain some state variables.
If the dependency array is empty, the callback function will get called only once when the component is mounted and won’t be called on any state changes.
// Callback will be called every time the component mounts.

useEffect(() => {
  // Do something
}, [])Code language: JavaScript (javascript)
Else, suppose we provide some state variables in the dependency array. In that case, the callback function will get called when the component mounts or any state in the dependency array changes.
// Callback will be called:
// 1. Every time the component mounts.
// 2. Every time the state1 or state2 changes.

useEffect(() => {
  // Do something
}, [state1, state2])Code language: JavaScript (javascript)
Now, we can use the useEffect() hook to properly call the fetchTodos() function. We will call the fetchTodos() function inside the useEffect() callback, and since we want to fetch the list of todos only once, we will provide an empty dependency array,
const fetchTodos = async () => {
  try {
    const response = await fetch(url);
    const data = await response.json();
    setTodos(data);
    console.log(data);
  } catch (error) {
    console.log(error);
  }
};

useEffect(() => {
  fetchTodos();
}, [])Code language: JavaScript (javascript)
Now, if we look at the console, we can see that the list of todos is logged only once,

Displaying the list of todos on the screen
Now, since we have stored the list of todos in our todos state variable, we can now display them on screen. To display the list of todos, we’ll iterate over each element of the list using map() and then return some JSX containing the to-do item details.
The map() function accepts a callback function as an argument. This callback function will be called with each element of the todos array. Whatever we return from the callback function will be pushed inside a new array, and this new array is returned from map().
todos.map((todoItem) => {
  return (
    <article>
      <h4>{todoItem.title}</h4>
      <p>status: {todoItem.completed ? 'Yes' : 'No'}</p>
    </article>
  );
})Code language: JavaScript (javascript)
We can render the new list returned by the map() function inside our component,
return (
  <main>
    <header>
      <h1>Todos</h1>
    </header>
    <section>
      {todos.map((todoItem) => {
        return (
          <article>
            <h4>{todoItem.title}</h4>
            <p>status: {todoItem.completed ? 'Yes' : 'No'}</p>
          </article>
        );
      })}
    </section>
  </main>
);Code language: JavaScript (javascript)
As soon as we make this change, we’ll be able to see the list of todos in our application,
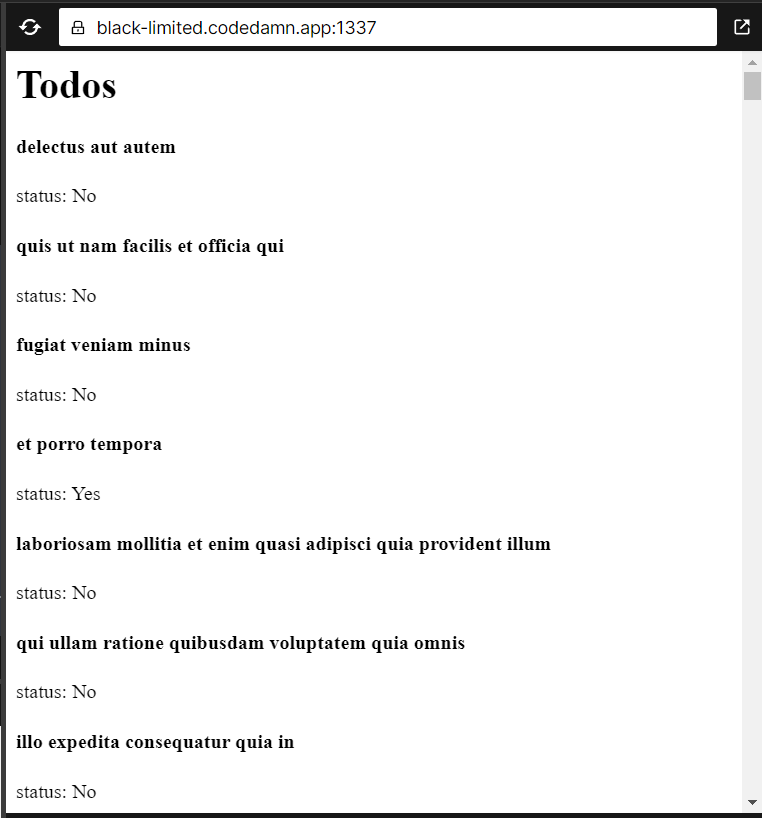
Woohoo ? We successfully fetched the list of todos and displayed them on the screen.
Here we used a straightforward API but could have also used a more complex one. The steps to fetch and render the data on the screen would still be the same.
Bonus
Now that we are comfortable fetching data using the browser’s native fetch() API, we can look at a better alternative. Axios is a promise-based HTTP client library that we can use to make HTTP requests with more flexibility.
One of the major advantages of Axios over native fetch() is backward compatibility. Axios uses the XMLHttpRequest behind the scene to make the HTTP request. This makes Axios compatible with some older web browsers like IE11 (fetch() doesn’t work on IE11). Another nice feature of Axios is Error Handling. Unlike fetch(), Axios makes it very easy to handle errors based on HTTP status codes. Also, with Axios, we don’t need to convert the response to JSON. It automatically does it for us after fetching the data.
You can install the Axios library from NPM by using the following command in your project directory,
npm install axiosCode language: Bash (bash)Let’s now try to fetch data from the same todos API we used earlier,
import axios from 'axios';

const url = 'https://jsonplaceholder.typicode.com/todos';

const fetchTodos = async () => {
  try {
    const response = await axios(url);
    console.log(response);
  } catch (error) {
    console.log(error);
  }
};Code language: JavaScript (javascript)
In the console, we can see the response object,
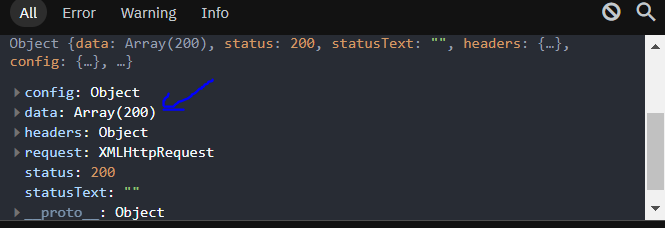
Also, with Axios, the data will be contained in the data key of the response object. Now, let’s replace the new fetchTodos() function with the old one in our App component,
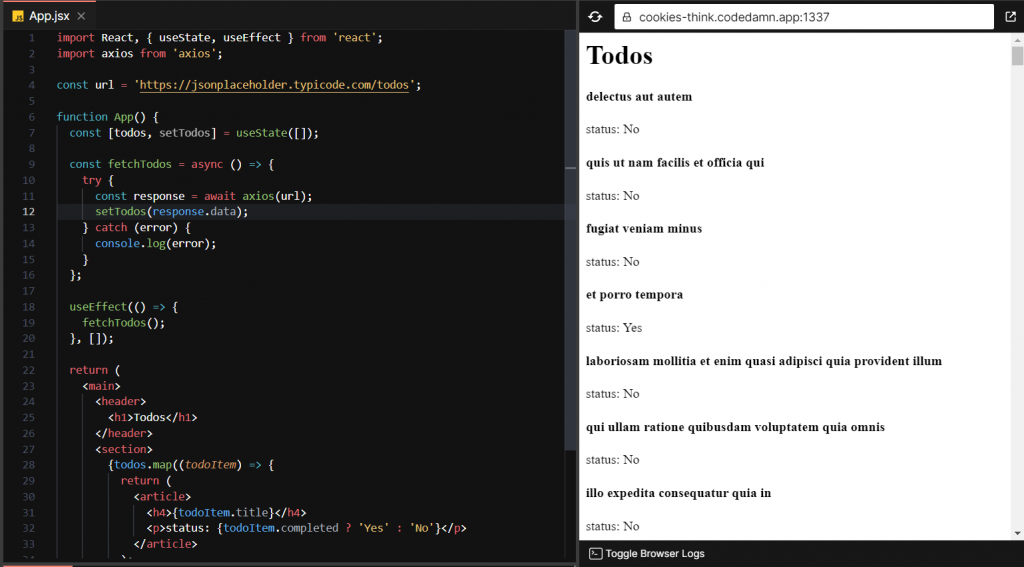
As you can see, we still see the list of todos on the screen. Please note that, since Axios puts all the data we get from the API on the data key of the response object, we must set the todos state using,
setTodos(response.data);Code language: JavaScript (javascript)Quick Tip
The HTTP request is typically enclosed in a try-catch block to catch any potential errors that may occur during the sending of the request or errors generated by the API,
try {
  const response = await axios(url);
} catch(error) {
  console.log(error)
}Code language: JavaScript (javascript)
You can access the error message sent by the API from the error object we have access to in the catch block. Axios places the error information sent by the API on the response key of the error object. It contains information such as headers, status, etc.
error {
  .
  .
  response: {
    // Error information sent by the API
  }
}Code language: JavaScript (javascript)
You can access the error payload sent by the API using,
error.response.dataCode language: JavaScript (javascript)Conclusion
In this article, we learned how to make HTTP requests to some API endpoints and retrieve the required data using the browser’s native fetch() API. Then, we learned how to use fetch() properly with React.js in order to request some information from an API and render it on the screen. Additionally, we looked at Axios, which is a better alternative to fetch().
Thank you so much for reading ?
Sharing is caring
Did you like what Varun Tiwari wrote? Thank them for their work by sharing it on social media.
No comments so far
Curious about this topic? Continue your journey with these coding courses:
