How to use Node JS with HTML? Guide on rendering HTML on server with Node

Node.js is popular JavaScript runtime released by Ryan Dahl on 27 May 2009 as open-source software. It is used mainly for the development of server-side Web Applications and APIs.
Although you can find many APIs using Node.js, did you know you can also use it to render HTML on the server? A more technical term you may have heard is Server Side Rendering (SSR).
What is Server Side Rendering?
If you are familiar with React.js, you may know that whenever your browser sends a request for your website to the server, the server responds with a plain HTML file, StyleSheets (CSS), and JavaScript files. The HTML files contain just a boilerplate template and nothing else. It’s the job of JavaScript to render everything on the DOM. This technique is called Client Side Rendering.
This approach works fine but at the same time has some drawbacks,
- It is often difficult to optimize client-side rendered applications for search engines.
- Slower devices may experience higher load time resulting in poor user experience.
- The application may use an API to fetch some data, resulting in additional server requests made, causing extra load time.
We use Server Side Rendering (SSR) to solve these issues. Server Side Rendering (SSR) is a technique where the server renders all the content needed for the website before sending it to the browser. The generated HTML page sent to the browser helps improve the webpage’s SEO and load times.
Rendering HTML with Node.js and Express.js
In an Express.js project, we can send the client HTML strings or files in a similar way we send an API response.
Here we have a simple Express.js application,
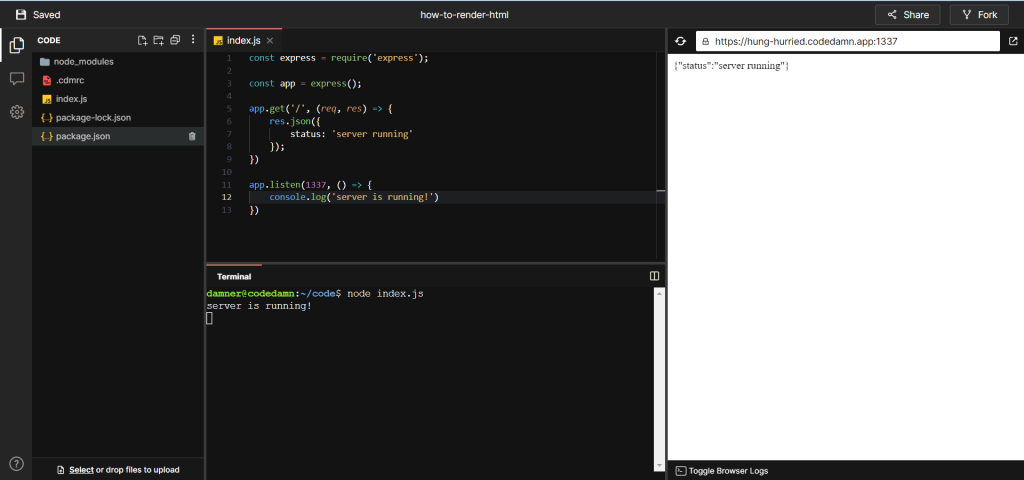
In the root route, we are sending a JSON response,
{
	"status": "server running"
}Code language: JSON / JSON with Comments (json)
Now to send an HTML response instead of a JSON response, rather than using the res.json() function, we will use the res.send(). Inside the res.send() function, we can provide a simple text string or an HTML string as an argument. After receiving the server’s response, the browser renders it accordingly.
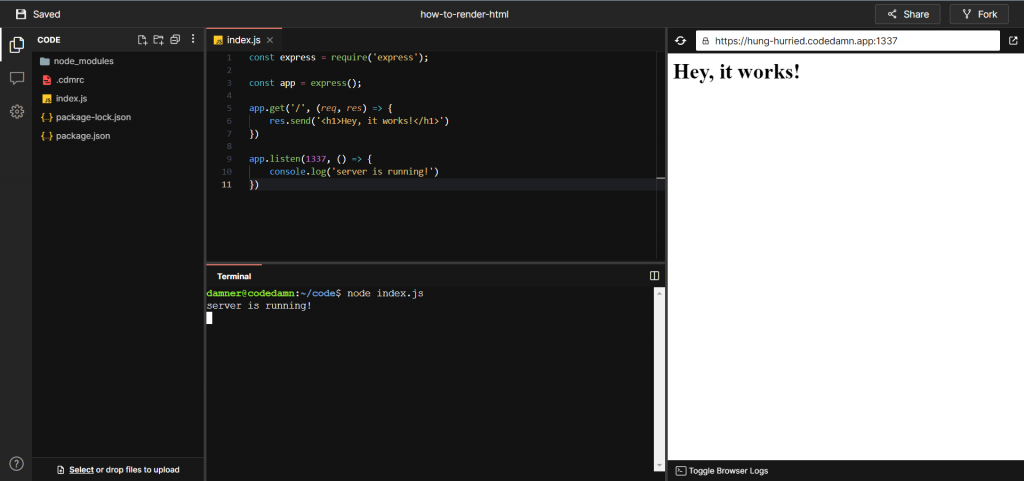
Let’s try to respond with some simple HTML strings,
app.get('/', (req, res) => {
    res.send('<h1>Hey, it works!</h1>')
})Code language: JavaScript (javascript)
After restarting our server, we can see that the HTML string is rendered correctly on the browser,
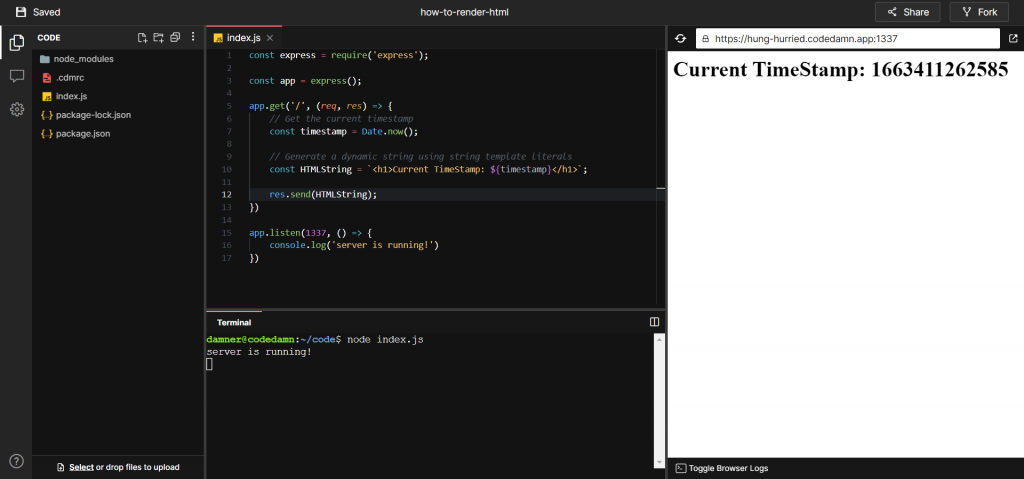
Suppose we want to render some dynamic HTML content; we can create a dynamic string using string concatenation or template literals,
// Get the current timestamp
const timestamp = Date.now();

// Generate a dynamic string using string concatenation
const string1 = '<h1>Current TimeStamp: ' + timestamp + '</h1>';

// Generate a dynamic string using string template literals
const string2 = `<h1>Current TimeStamp: ${timestamp}</h1>`;Code language: JavaScript (javascript)
Now every time we reload the page, the timestamp gets updated,
Rendering HTML files with Node.js and Express.js
Writing all the HTML content as a string and then sending it through res.send() isn’t a good idea. It would have been better to write our HTML in a .html file and then send the whole file as a response. We could do so by using the res.sendFile() function.
Let’s create a index.html with some boilerplate content on it,
<!DOCTYPE html>
<html lang="en">
<head>
    <meta charset="UTF-8">
    <meta http-equiv="X-UA-Compatible" content="IE=edge">
    <meta name="viewport" content="width=device-width, initial-scale=1.0">
    <title>Document</title>
</head>
<body>
    <h1>Codedamn playgrounds is awesome!</h1>
</body>
</html>Code language: HTML, XML (xml)
We will use the res.sendFile() function to send the file as a response. The function takes the file path as an argument. The file path must be absolute or a specific root. To achieve this, we will use Node.js’s built-in path module,
const path = require('path');

const filePath = path.resolve(__dirname, 'index.html');Code language: JavaScript (javascript)
The path.resolve() function returns an absolute path from a series of paths or segments. The __dirname returns the path to the current module.
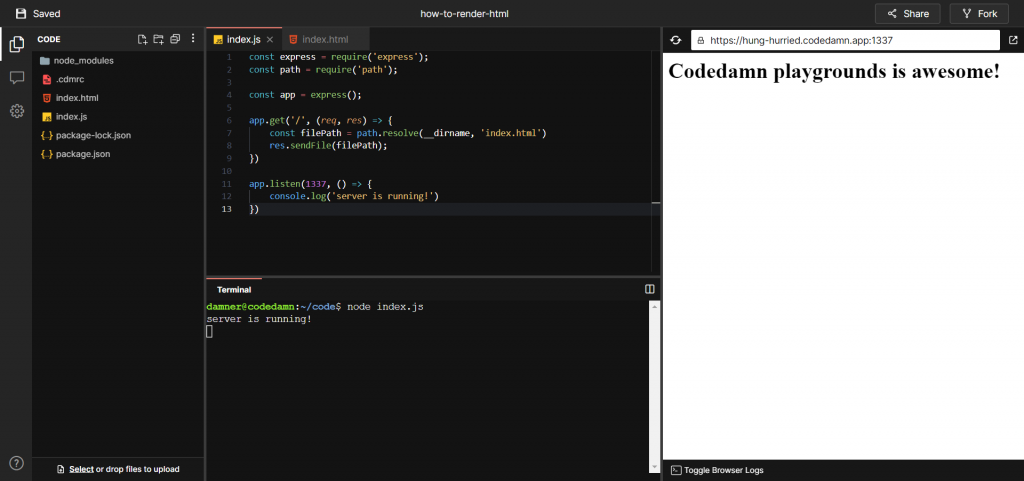
We can now send the HTML file using the path module as
const filePath = path.resolve(__dirname, 'index.html');
res.sendFile(filePath);Code language: JavaScript (javascript)
The complete HTML file will now be sent and rendered by the browser,
What is a Templating Engine?
While it is convenient to send an HTML file containing all the content, at the same time, it makes it challenging to render dynamic content. In this case, we would need JavaScript to fetch the content from an API. Although HTML strings can display dynamic content, the file size will eventually become enormous owing to the large number of HTML strings used.
What if there was something that combined the dynamic nature of HTML strings and the convenience of HTML files? Well, Templating engines can save the day!
Using templating engines, we write some HTML in pre-defined syntax (syntax may change with the template engine we are using). The templating engine takes the template, and some data, combines them, and returns a complete HTML page which we can send to the client.
Many templating engines, like EJS, Pug, Mustache, etc., can generate HTML pages on the server side. We will look at EJS since it’s the most widely used one.
Rendering HTML using EJS (Embedded JavaScript Templating)
Embedded JavaScript Templating (EJS) is a top-rated template engine for JavaScript. It embeds JavaScript code in a template language that generates HTML.
We must follow some extra steps to configure EJS properly in our Express.js application.
Installing EJS
We can download the EJS package using the NPM package manager with the command,
npm install ejsCode language: Bash (bash)Setting up EJS as our view engine in Express.js
To tell express to use EJS as the default view engine, we will write,
app.set('view engine', 'ejs');Code language: JavaScript (javascript)The above code tells Express.js that whenever we try to render a template with some data, it should use EJS as the templating engine.
Setting up the views
Create a directory named views inside the root of our project. Inside the views directory, create another directory called pages.
The project structure will look like this,
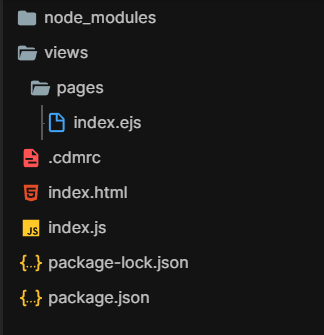
The pages directory will contain the HTML templates. Let’s create our first EJS template. Create a file index.ejs inside the views/pages directory and write some HTML inside it,
<h1>Hi User, Welcome to Codedamn</h1>Code language: HTML, XML (xml)We can now use the above template to generate HTML.
Rendering the template
We will use the res.render() function to render a template. We can render the template we just created using,
res.render('pages/index');Code language: JavaScript (javascript)Here, pages/index is the template we want to render. The EJS engine will parse the template and generate HTML, which will be sent to the client by the Express.js server,
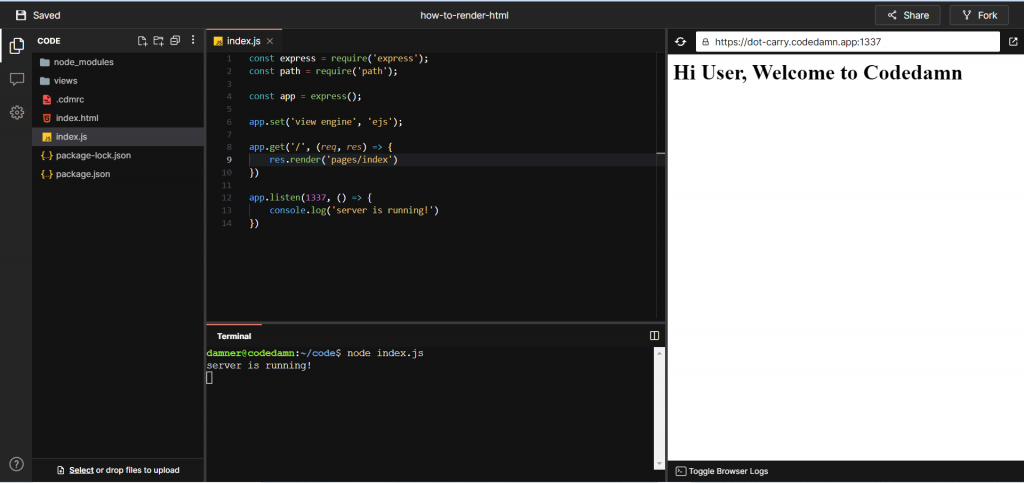
Passing data to the template
We can pass the second argument in the res.render() function containing the data we want to give to the template. Let’s provide some data as the second argument to the res.render() function,
const data = {
    username: 'Varun Tiwari',
};

res.render('pages/index', data);Code language: JavaScript (javascript)
We can now use the data inside our template using the <%= variable %> syntax. It will output the value of variable at that place inside the template. So now, let’s update our template,
<h1>Hi <%= username %>, Welcome to Codedamn</h1>Code language: HTML, XML (xml)Restarting the server and reloading the page, we can see that the HTML generated has the username embedded,
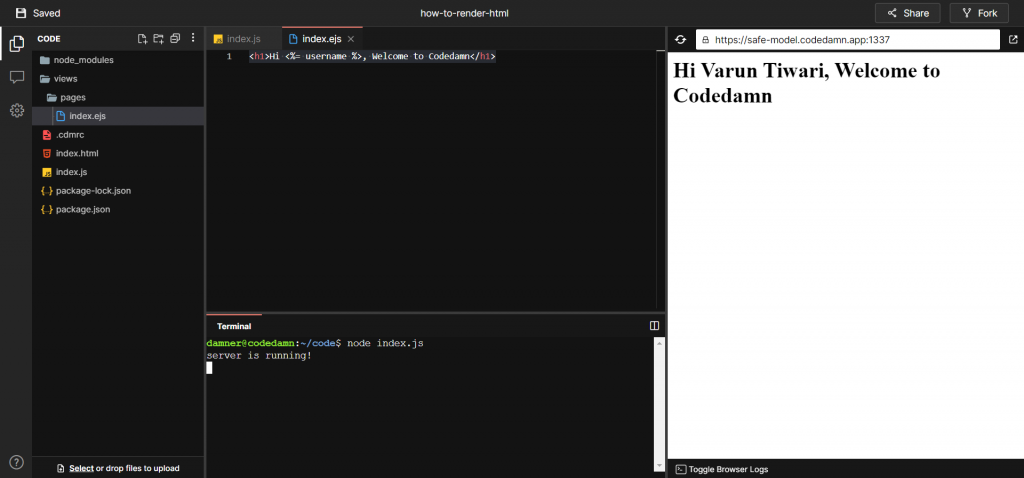
As its name suggests, EJS is Embedded JavaScript Templating, which means we can use any valid JavaScript inside an EJS template using the <% JavaScript %> syntax, where JavaScript is where you write JavaScript.
We can use for, for in, for of, while, etc. loops, and if-else statements inside our template.
To output any value, we use an = symbol after the first % symbol: <%= value %>.
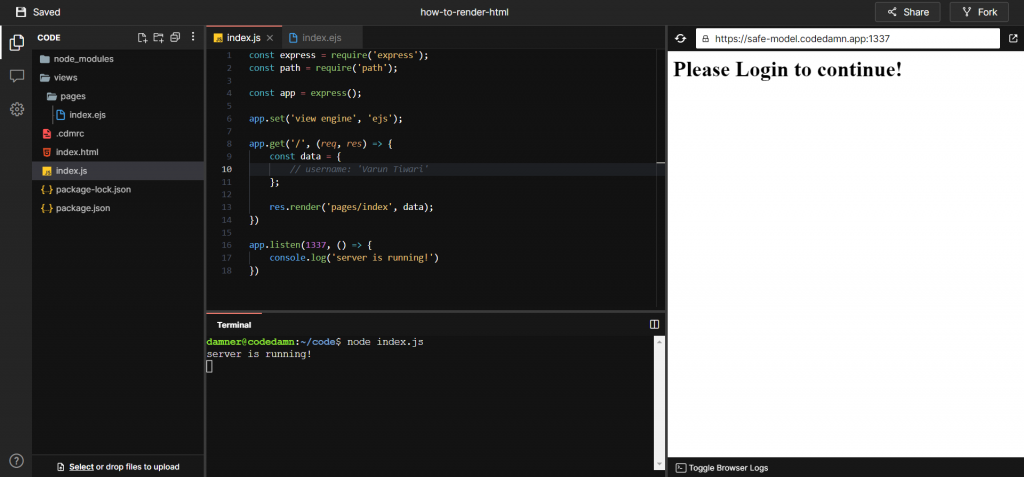
For instance, we can check if the username exists or not. If it exists, welcome the user. Otherwise, tell the user to log in. We can do this by writing,
<% if (typeof username === 'string') { %>
    <h1>Hi <%= username %>, Welcome to Codedamn</h1>
<% } else { %>
    <h1>Please Login to continue!</h1>
<% } %>Code language: HTML, XML (xml)
Now, if we define the username key on the data object, we will see,
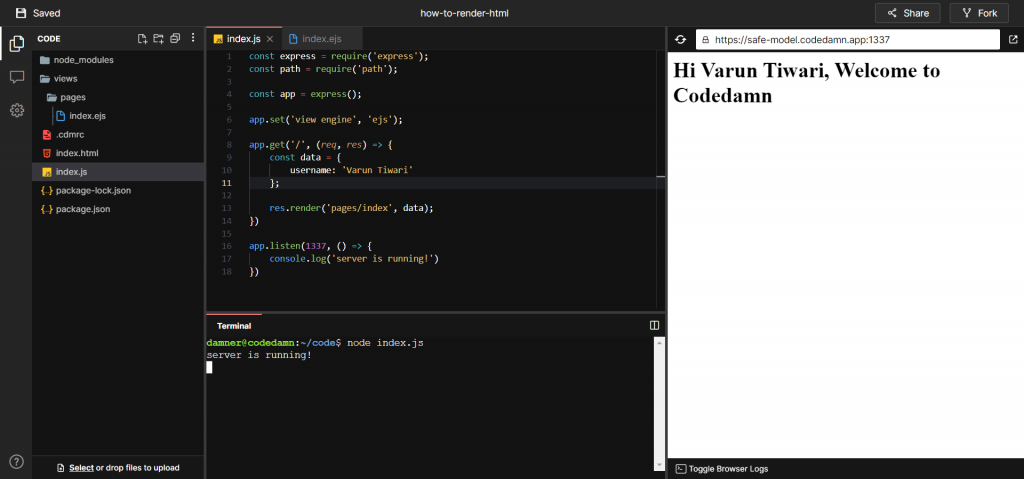
Otherwise, we will see,
How to get help?
To learn about some advanced concepts and complex use cases of EJS, you can visit the EJS’s official documentation.
Conclusion
This article explored various ways to render HTML content from Node.js and Express.js servers. Furthermore, we looked at how Templating Engines can combine dynamic string interpolation with HTML files to create an integrated solution. As a bonus, we saw how we could integrate the EJS templating engine into our Express.js application and use it to render some dynamic content.
Sharing is caring
Did you like what Varun Tiwari wrote? Thank them for their work by sharing it on social media.
No comments so far
Curious about this topic? Continue your journey with these coding courses:
