Next.js 13.3 Just Dropped – Everything You Need to Know

Next.js is one of the most popular React frameworks in the React community. It is a one-stop shop for building server-side web apps on top of React. The Next.js 13 release last year had some well-needed features like server/client components, streaming, layouts, and the app directory. This year, it’s back with another upgrade with the release of Next.js 13.3. It has a lot of new features and amazing features.
Let’s take a closer look at what Next.js 13.3 has to offer. We’ll also look at how to implement this feature in new or existing Next.js 13 projects.
File-Based Metadata API
The most important thing to include in our applications for good SEO is meta tags. However, putting a lot of meta tags inside the head tag in our JSX can make it look cluttered and difficult to edit.
With this in mind, Next.js released a new metadata API in version 13.2, allowing us to define meta content such as the page’s title and description by exporting a metadata object from the page or the page’s layout.
export const metadata = {
  title: 'Profile page',
  description: 'This is the profile page',
};

export default function Page() {
  // Page
}
Code language: JavaScript (javascript)
These values are automatically filled in within the page’s <head> tag as follows:
<head>
  <title>Profile page</title>
  <meta name='description' content='This is the profile page' />
</head>Code language: HTML, XML (xml)
Coming to the current version 13.3, Next.js includes a new file-based metadata API for easily adding favicons, open graph images, sitemaps, and other file-based conventions.
Here’s a list of file name conventions to use for adding files to your page’s meta tags:
opengraph-image.(jpg|png|svg): Add the page’s open-graph (OG) image.twitter-image.(jpg|png|svg): To add a Twitter image to the page.favicon.ico: To create a favicon for the page.icon.(ico|jpg|png|svg): To include an icon on the page.sitemap.(xml|js|jsx|ts|tsx): To specify the sitemap for the page.robots.(txt|js|jsx|ts|tsx): For specifying search engine crawler configuration.manifest.(json|js|jsx|ts|tsx): For specifying the page’s PWA (Progressive Web Apps) configurations.
To use these, simply create a file with the above naming convention inside your route directory.
└─ app
   ├─ favicon.ico
   ├─ layout.js
   ├─ page.js
   └─ profile
      ├─ opengraph-image.png
      ├─ page.js
      └─ twitter-image.pngCode language: plaintext (plaintext)
Next.js will add these files in the meta tags within the <head> tag:
// Route: /profile
<head>
  <meta property='og:image' content='<url>' />
  <meta name='twitter:image' content='<url>' />
</head>Code language: HTML, XML (xml)
As you can see, using the metadata config object and file-based metadata conventions makes it very easy to manage the files and meta information for the page.
The complete documentation for the file-based metadata API is available here.
Dynamic Open Graph Image
In a nutshell, Open Graph is used to control how URLs appear when shared on Social Media platforms. For example, this is how the link to this article appears on Twitter.

It displays the article’s banner image, title, and a short description. The Open Graph protocol makes this possible.
The Open Graph (or, OG) title and description can be easily made dynamic, but images cannot. You can either store static images already, which is not possible for a large number of dynamic pages, or you can generate the images dynamically.
But how do you generate images dynamically?
Vercel released @vercel/og and Satori a few months ago. @vercel/og is a library for creating dynamic images using only HTML and CSS. It then uses Satori to convert HTML and CSS to SVGs.
You can try it out for yourself by using this playground.
Although it is very convenient, you must install the @vercel/og library separately. But now, with Next.js 13.3, you don’t need an external package. The next/server package now exports ImageResponse which you can use to generate dynamic OG images.
Here’s how you can use it.
import { ImageResponse } from 'next/server';

export default function OgImage() {
  return new ImageResponse(<div>Next.js 13.3</div>, {
    width: 1200,
    height: 600,
  });
}
Code language: JavaScript (javascript)
It works well with the other Next.js APIs. As a result, you can use the ImageResponse component within the opengraph-image.tsx file to generate OG images at build time or on demand.
The complete documentation for dynamic open-graph image generation is available here.
Static Export for App Router
Next.js does not necessarily need a server running. In fact, you can export your app as a static website with HTML, CSS, and JavaScript, without the need for a Node.js server to be running. This is called static exports.
These static assets produced by static exports can be used with any hosting provider that can serve static HTML, CSS, and JavaScript. There is no need for complicated server setups.
Previously, Next.js required a separate command, next export, to perform a static export. Running the next export command after next build will generate the necessary HTML, CSS, and JavaScript files.
next build && next exportCode language: Bash (bash)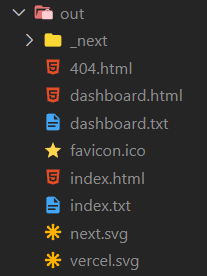
out directory.The next export command has been deprecated in Next.js 13.3, and you can now achieve the same functionality by specifying output: 'export' in your next.config.js file.
const nextConfig = {
  // ...
  output: 'export',
};Code language: JavaScript (javascript)
It will have the same effect as the next export command, generating the required HTML, CSS, and JavaScript in the out directory when you run next build.
Parallel Routes
Assume you have a dashboard on which you have to display a UI if the user is a Super Admin, and a different UI if the user is a normal user. There will also be some UI shared by both of them.
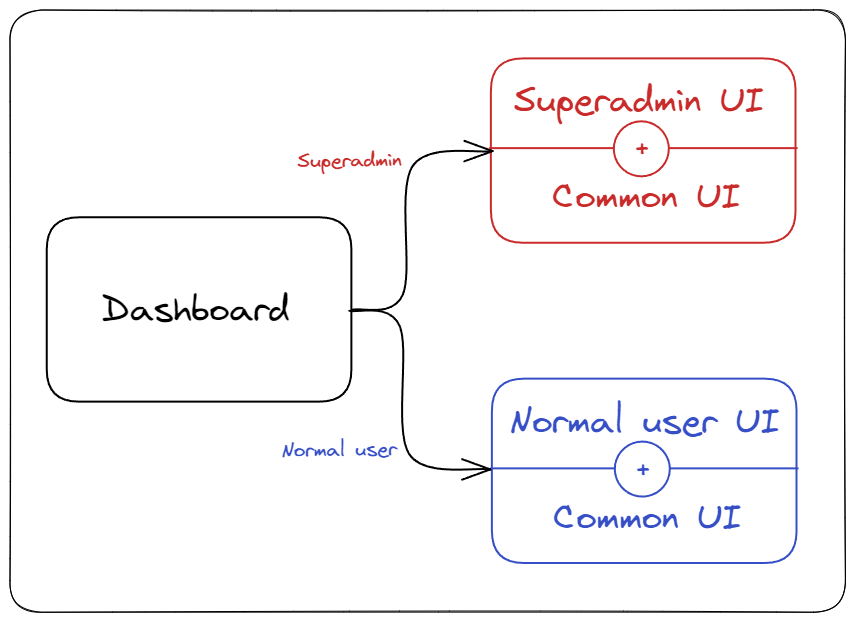
The URL, however, should not change and should remain the same for both of them.
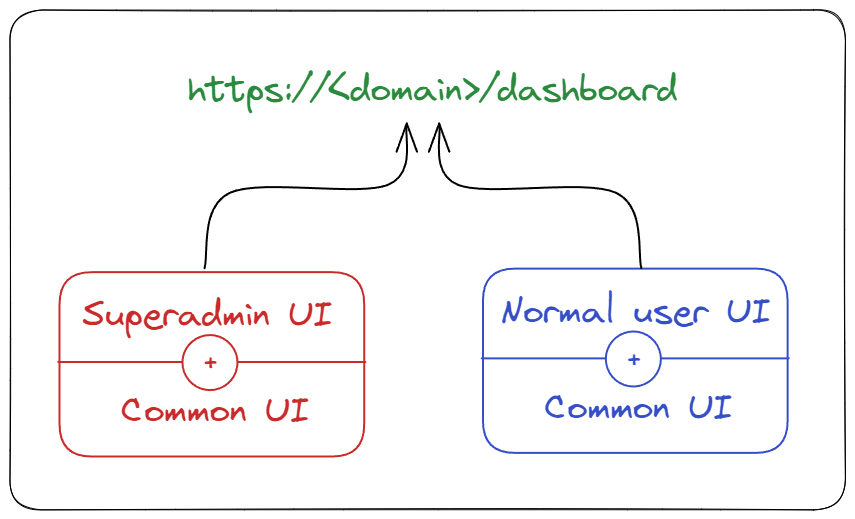
To make it possible, Next.js 13.3 introduces parallel routes. You can use parallel routes to render one or more pages in the same view at the same time, as well as to render pages conditionally.
We’ll use the @foldername naming convention to create parallel routes. These are called named slots. And within the @foldername directory, we’ll create a page.js file with the UI for the parallel route.
└─ dashboard
   ├─ @normaluser
   │  └─ page.js
   ├─ @superadmin
   │  └─ page.js
   ├─ layout.js
   └─ page.jsCode language: plaintext (plaintext)
// @normaluser/page.js
export default function Page() {
return <h3>Normal User UI</h3>;
}
Code language: JavaScript (javascript)// @superadmin/page.js
export default function Page() {
return <h3>Super Admin User UI</h3>;
}Code language: JavaScript (javascript)Now we’ll render these parallel routes within the current route’s layout. The layout component will accept these parallel route components (or slots) as props, along with the children prop, which is for the current route.
export default function Layout({ children, superadmin, normaluser }) {
  // ...
}Code language: JavaScript (javascript)
Now we have the option of rendering them both on the current route or rendering them conditionally. In the current example, we’ll render them conditionally in order to display additional UI based on the user’s role.
export default function Layout({ children, superadmin, normaluser }) {
  const userRole = getUserRole();
  return (
    <>
      {userRole === 'superadmin' ? superadmin : normaluser}
      {children}
    </>
  );
}Code language: JavaScript (javascript)
This way, using parallel routes, we can conditionally render routes based on the user’s role.
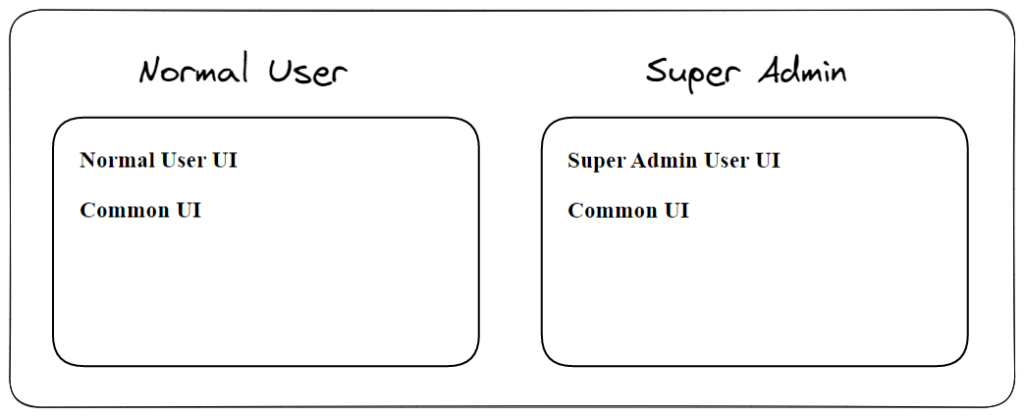
Route Interception
Route interception is another fantastic addition to Next.js 13.3. You can see a preview of another route in the current route while masking the URL.
In other words, clicking on a link changes the URL in the browser, but instead of opening a new page, it displays a preview modal of the new route. Reloading the page brings us to the new page.
It is useful in situations where you need to show the user a preview of something. For example, clicking someone’s profile avatar will open a sort of modal, or clicking the cart icon will open a mini preview of the cart.
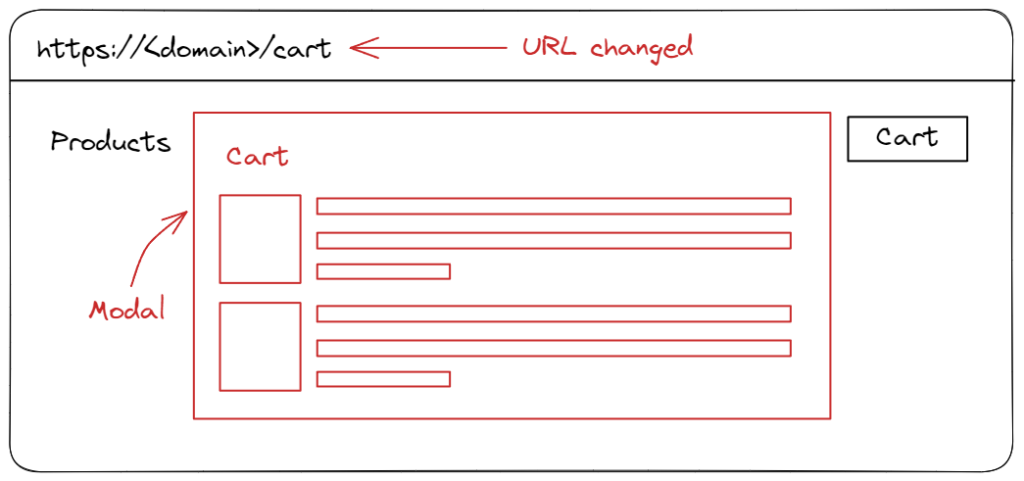
Let’s take a look at how to use this feature. We’ll use route interception with parallel routes to achieve the desired result of opening a preview on a modal.
You must use the (..) convention, which is similar to the ../ relative path, to perform route interception. Alternatively, you can use the (...) convention for paths relative to the app directory. You’re basically configuring the route name for the preview by using a relative path to the route directory.
Let’s take an example, create a @modal parallel route that will be used to display the profile page preview. We’ll create an intercepted route (..)profile within it, which will contain a preview of the profile page..
└─ app
   ├─ @modal
   │  ├─ (..)profile
   │  │  └─ page.js
   │  └─ default.js
   ├─ layout.js
   ├─ page.js
   └─ profile
      └─ page.jsCode language: plaintext (plaintext)
We’ll create a page.js file inside the intercepted route (@modal/(..)profile), which will be rendered on the page preview.
// @modal/(..)profile/page.js

export default function Page() {
  return <h1>Profile page preview</h1>;
}Code language: JavaScript (javascript)
Finally, render the modal inside the layout file.
// layout.js

export default function Layout({ children, modal }) {
  return (
    <>
      {children}
      {modal}
    </>
  );
}Code language: JavaScript (javascript)
Now, clicking on the username link will open the preview modal.
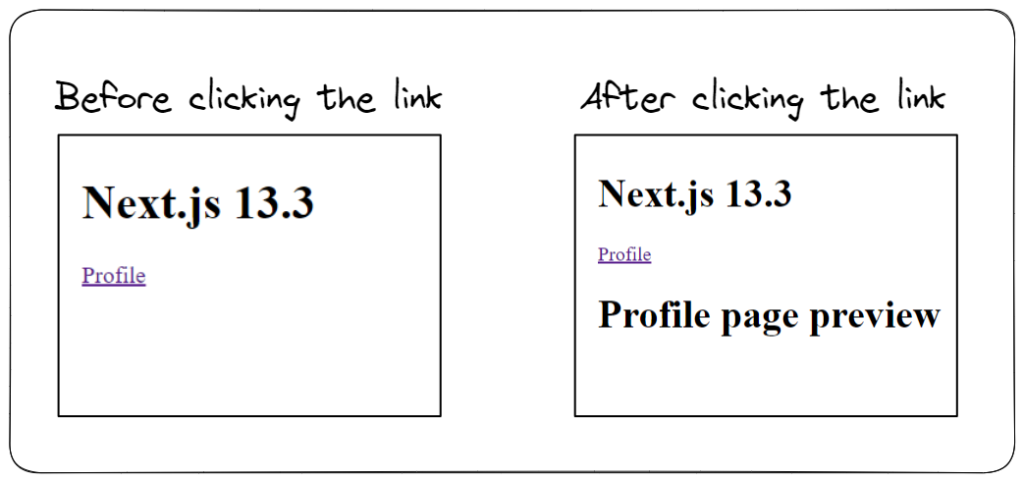
Of course, you can style the preview page to look like a modal. The purpose of the previous example was to provide a general understanding of route interception in Next.js 13.3.
How to upgrade to Next.js 13.3?
Simply run the following command from the project root to upgrade an existing Next.js project:
npm i next@latest react@latest react-dom@latest eslint-config-next@latest
Code language: Bash (bash)
You can also use the create-next-app tool to start a new project. It will use the most recent version of Next.js, i.e., 13.3.
npx create-next-appCode language: Bash (bash)After running the command, you’ll be prompted to select project configuration options. To use all of the features of Next.js 13.3, make sure opt in for the experimental app directory.

create-next-app CLI tool to create a new Next.js 13.3 appSummary
Next.js is one of the most popular React frameworks in the React community, and it is constantly updated. Next.js’s most recent version, Next.js 13, was already a blast. Now, with Next.js 13.3, the Next.js team has added even more amazing features to the platform. File-based metadata API, Dynamic open-graph images, static exports for the App router, parallel routes, and route interception are among the features.
To use these features, you can either upgrade your existing Next.js app or create a brand new application with the create-next-app tool.
This article hopefully provided you with some new information. Share it with your friends if you enjoy it. Also, please provide your feedback in the comments section.
Thank you so much for reading 😄
Sharing is caring
Did you like what Varun Tiwari wrote? Thank them for their work by sharing it on social media.
No comments so far
Curious about this topic? Continue your journey with these coding courses:


