Docker Tutorial: Introduction and how to get started?

If you are like most people, you have probably heard of the term “Docker” or you probably know a bit about Docker and how it can help simplify the deployment and management of applications. But what if you’re new to Docker? If you haven’t heard of it before? if that is you, you’re in luck! Since we’re going to discuss how to use Docker to start making life easier for you and your team today.
If you are unfamiliar with Docker, it is a software platform for developers to create, test and deploy applications in a repeatable and consistent way. This enables developers to concentrate on their application code rather than the supporting infrastructure.
This tutorial will walk you through the basics of Docker and explain how to build your first application using Docker.
What is Docker?
First, we’ll start by defining what Docker is and how it works. Before getting any further into this guide, it’s important for you to know what exactly Docker is.
According to their website, Docker is “a platform to build, ship, and run distributed applications…”
It allows you to run applications in containers rather than on the actual computer. So, what exactly does that imply? Let me elaborate. When you use Docker to run an application, it actually executes the program inside of a “container,” as the name suggests.
Containers are basically just smaller virtual machines that you can run on your computer. They isolate applications from the rest of your operating system so that your other applications don’t have to interfere with them.
Let’s provide an example to help you understand. Let’s say you want to run a web server on your computer. Usually, when you run a web server on your computer, you would have to open ports in your firewall so that other people on the internet can connect to it.
If you have other security programs running on your computer that detect and stop viruses and other unwanted software from infecting your computer, those other programs could block people from connecting to the web server that you have set up. This is where Docker comes in handy.

In simple terms, Docker is software that gives you the ability to run applications in a software container on a single machine or across a cluster of machines. A container is similar to a virtual machine. But unlike a virtual machine, a container only runs one application at a time. This makes it more efficient because you can run more containers on a single machine than you could with a VM.
A container can run any operating system including Windows, Linux, BSD, etc. As a consequence, you may run any program on it regardless of the operating system it runs on.
It enables you to set up separate environments for each program you run on your computer. You can utilize Docker with a wide range of apps.
You may use it, for instance, to manage your own databases and web servers. Before putting new programs into use, you can test them. You can also use them for development purposes by creating different development environments for different projects that you are working on.
What is the difference between a Container and a Virtual Machine?
A container does not keep copies of its files on the host computer, which is the primary distinction between a container and a virtual machine (e.g. the hard drive). Instead, containers use the file system of the host server to store its files. This differs from virtual machines, which store copies of the files within the virtual machine itself.
How does Docker work?
Now that you have a basic understanding of what a container is, it’s time to learn how it actually works.
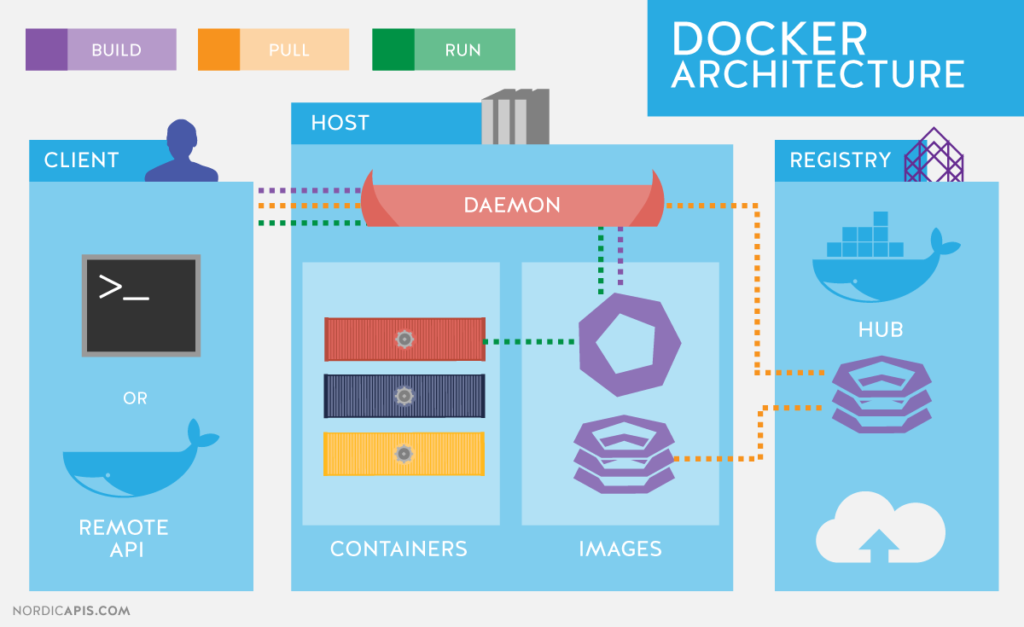
All of the files required for an application’s functionality are gathered and compressed into a single file known as a Dockerfile when it is packaged into a container. The Dockerfile contains specific creation instructions in great detail. It contains directions for installing any dependencies necessary for the application to function.
When the Dockerfile is complete, it is posted to a public repository like the Docker Hub so that other users can access it. Users can then create their own containers using the newly created Dockerfile.

Development is made simpler by the containerization process, which enables you to test and deploy your application without worrying about whether it will function correctly on a particular platform.
When your container is ready, you may use the Docker Engine to deploy it to your servers.
Using the Docker Engine, you can run and manage your containers across multiple servers, which makes it easy to scale your application up or down depending on your needs.
How can I begin using Docker?
You’re ready to start using Docker now that you know more about it and how it works!
So you want to get started with Docker? Awesome! We’ll go through the fundamentals of using Docker to create and manage containers in this lecture. Let’s get this party started!
First, you’ll need to install Docker on your computer. Don’t worry—it’s super easy to do!
Install Docker for Windows or Mac
Installing Docker on your operating system of choice is easy – just follow the appropriate link below:
Run the following commands to install Docker on your machine:
$ sudo apt-get update

$ sudo apt-get install docker.ioCode language: Bash (bash)
Open a command prompt and type: docker -v
If you see the word “1.12.0”, then your installation is complete! Otherwise, your installation may have failed, or you may need to get the most recent version of Docker from the website.
Note: If you use a Mac, you might need to do a little research first because the installation process for OS X is carried out via the command line.
Once you’ve downloaded and installed Docker, you’re ready to move on to step two…
Create your first image
Now that you’ve installed Docker on your computer, it’s time to create your first image! An image is a collection of all of the files that make up your application or service.
- To create an image, open the Docker application on your computer and click on the “Create” button at the top of the screen.
- Then, from the drop-down menu, choose “Image”. This will bring up the Image Creation wizard, where you’ll be able to name your image and choose where to store it.
- You’ll be ready to start deploying your apps to containers after you’ve completed the setup procedure!
Create a container
- Next, we will create a new directory for our app by navigating to the directory where you would like to store your application and typing the following command:
$ mkdir my_appCode language: Bash (bash)- Now navigate to the newly created directory and type the following command to run the app:
$ cd my_app
$ docker run hello-worldCode language: Dockerfile (dockerfile)- In this command, “hello-world” is the name of the application that we will be running. Our app will run in a container called “hello-world.”
- You can stop your container at any time by pressing Ctrl + C in your terminal window. To make sure that your container is running properly, you can open your web browser and visit http://localhost:8080. If everything is working as it should, you will see a welcome message in your browser that says “Hello World!”.

- To stop the container, run this command:
$ docker stop hello-world Code language: Dockerfile (dockerfile)- Once you’re finished playing with the container, delete the original file you created for it by navigating to the directory where it was saved and running the following command:
$ rm hello-world Code language: Dockerfile (dockerfile)Remember that you will need to run the commands from the terminal each time you run a new container, rather than using a shortcut in an application like Docker for Windows or Mac. You can only have one active container at a time.
If you want to start a new container, you must first shut down the existing one by running the command above.
Congratulations! You have successfully deployed your first application using Docker.

Docker serves several functions. It is used to deploy any application. Using the skills you learned in this tutorial, you can run any PHP-based application, including Drupal or WordPress.
You can also use these same techniques to bundle multiple applications into a single container and run them simultaneously using a single command. For example, you could have a web server running along with an application server all in the same container. The possibilities are endless!
Advantages of using Docker
There are many advantages to using Docker over traditional virtualization methods. Here are just a few of them: –
- It’s lightweight and fast
- You don’t need to have a super-powerful computer to run Docker.
- It’s simple to set up and doesn’t require any software to get started.
- It isolates applications and keeps them separate from the rest of the system (so there are no conflicts with other processes or programs).
- Your applications may be scaled vertically or horizontally without the need for additional hardware.
- It allows for faster testing, deployment, and maintenance.
- It takes little effort to start and stop services and easily construct and destroy containers.
- It keeps all of your data inside individual containers and keeps your system secure.
Conclusion
Docker is a powerful tool that can help you create and run applications with ease. Docker allows you to bundle apps into containers and deploy them anywhere. We hope this lesson has helped you understand what Docker is and how to use it. Thanks for reading!!
Sharing is caring
Did you like what Vanshika wrote? Thank them for their work by sharing it on social media.
No comments so far
Curious about this topic? Continue your journey with these coding courses:


