Building an interactive lab course item on codedamn

Building an interactive lab is probably the most interesting part of using codedamn to sell your courses – this gives users an actual playground to practice, make mistakes, learn and move ahead. Please read this article carefully to save hours later (figuring why/how a feature works). Let’s start.
Chapter 1: Introduction to codedamn creator panel
Chapter 2: Getting started with your first interactive course
Chapter 3 (currently reading): Building an interactive lab course item
What is possible?
Before we start, let us discuss what is possible and what is not possible to build using this lab interface. Here’s a typical example of a lab running inside a codedamn course (building a rate limiter API project for a Node.js course):

Here’s what we can support theoretically:
- All web development technologies and frameworks
- Any open-sourced compiler that can run on Linux inside a dockerized environment
- Any (tcp) service listening on port 1337 inside the docker container gets mapped to the public hostname the user gets. (For example – the server above is started on port 1337 internally and is exposed via a random URL on the right) (we will discuss more on this)
Let us now see how you can build a lab step by step
Step 1 – Creating a lab item
Just like video course items, you have to create labs separately and link them with individual course items. When you add a lab item and click on the pencil icon, you’ll see something like this.

All your non-linked labs will be displayed here. That is, once you select and link a lab it would not be shown here. You may clone the lab (read more to know-how) to re-use it.
Click on “Create new lab” on the top right to start with a new lab.
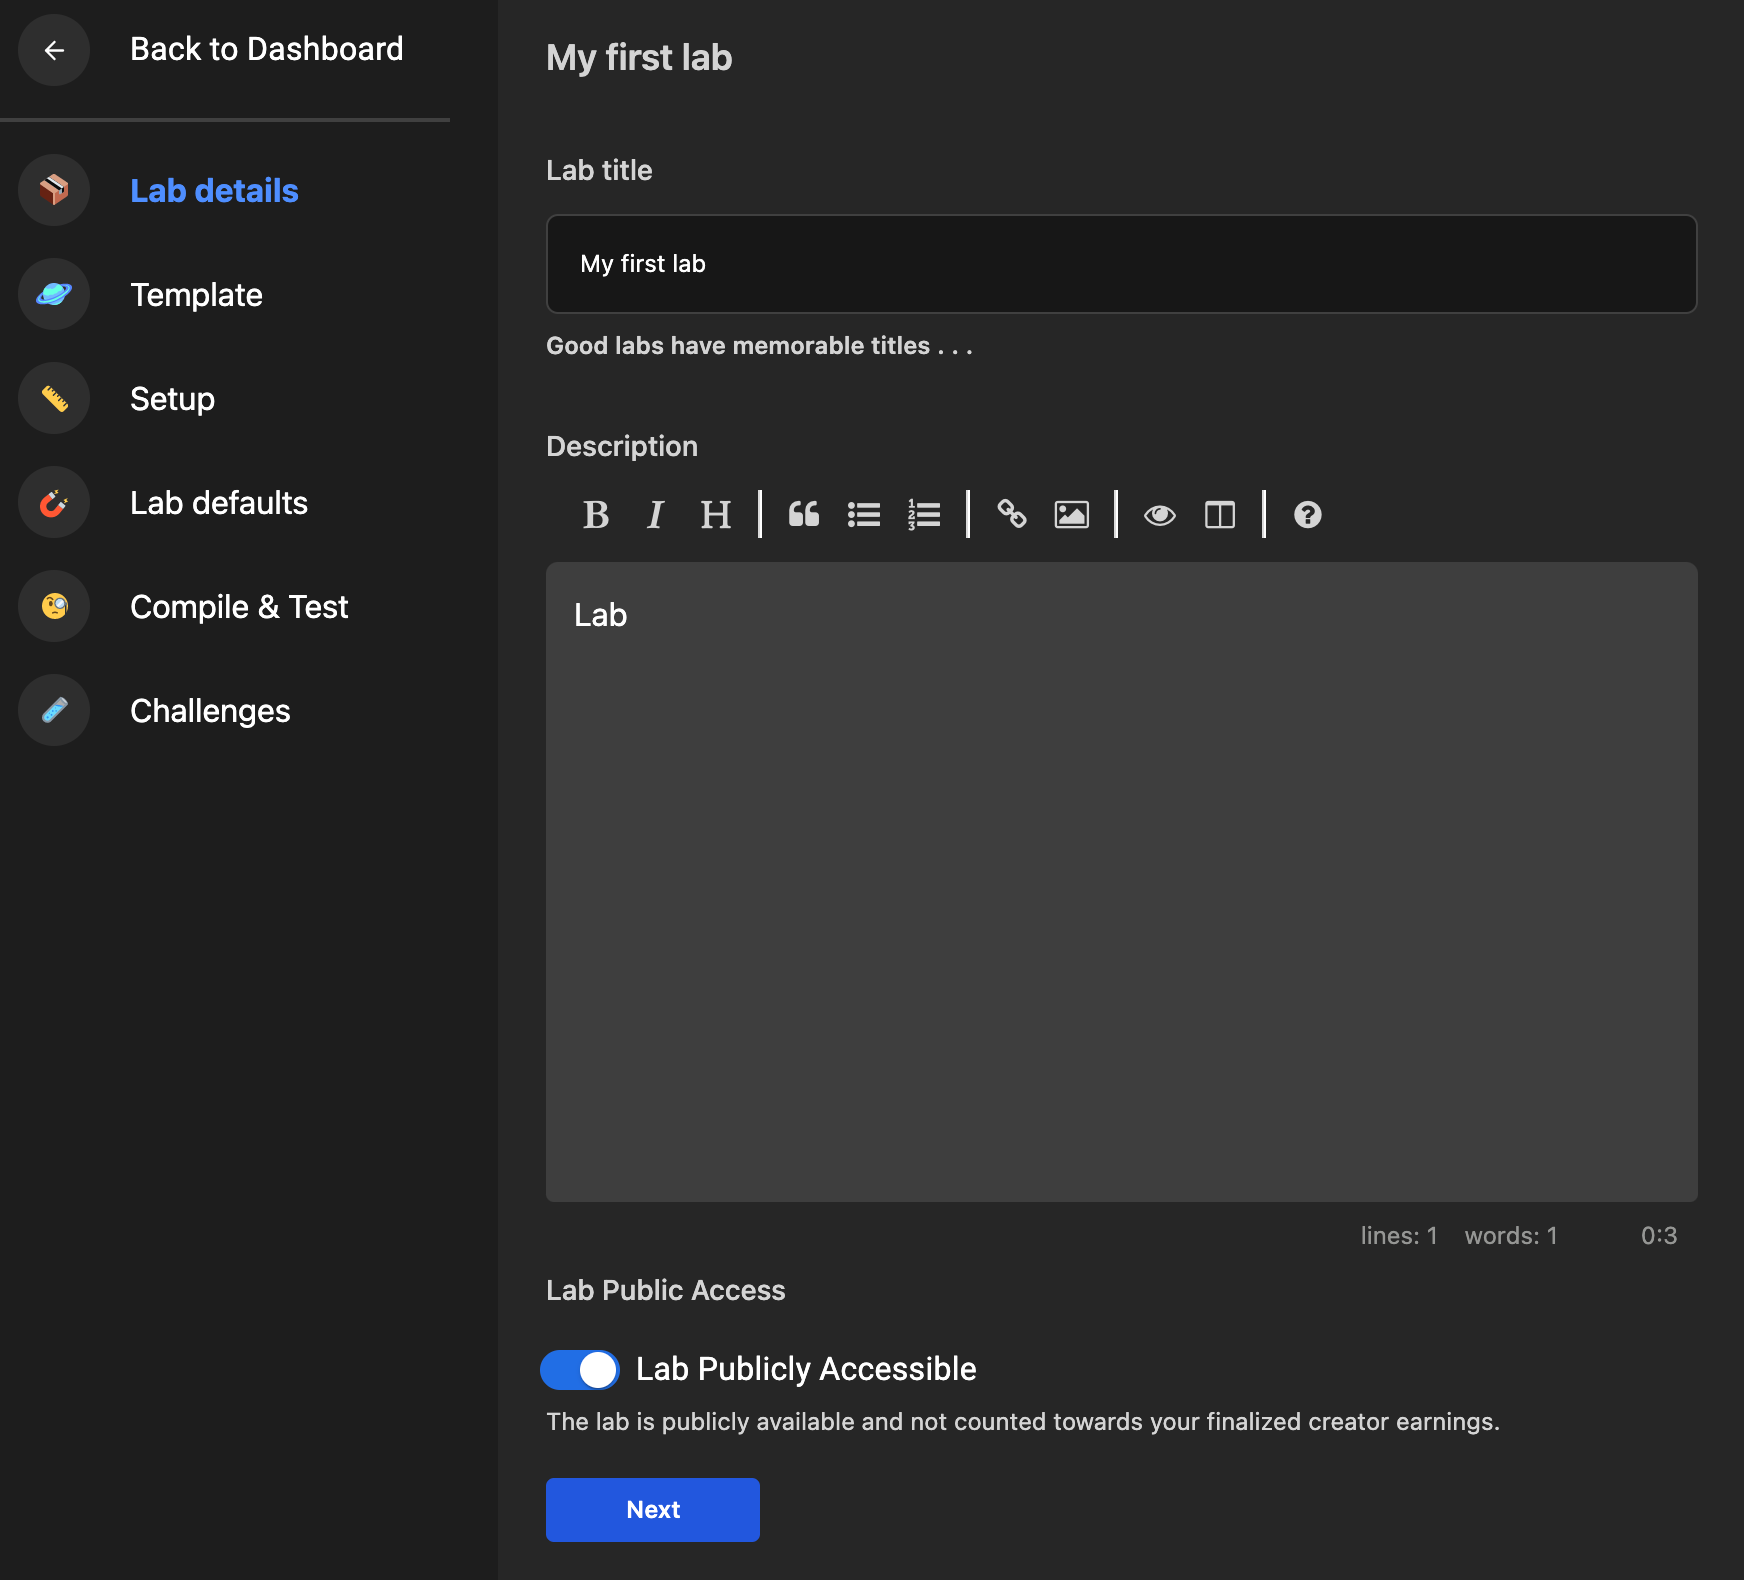
Step 2 – Lab Details

This area is the first screen you’ll see. Use this to add text as a description and title to your lab. For example, in the image you see at the top of the article, the metadata is the content you see on the left.
Lab Public Access
If the lab is public, this lab could be accessed by everyone even if your course is paid. This is great to set a few lab projects as previews for everyone.
Once you’re done, press Next.
Step 3 – Template

A template is a set of pre-installed software (called runtime) guaranteed to be included and running with sane defaults when you/the user attempts the lab.
For example, here are the images we currently support (this might be outdated and would be updated occasionally to reflect recent additions):
HTML/CSS/JS – Includes puppeteer, Node.js, and automatically runs a static file server inside the default user directory.
React 18 – React 18 using Vite inside the default user directory.
Next.js 11 – Next.js 11 support
Node.js – Node 14 pre-installed.
Truffle & ganache-CLI – Truffle and ganache-CLI pre-installed for Web 3.0 projects (solidity)
Python 3.8 – Python 3.8 compiler available
Let’s say you’re building a course where you show people how to convert websites into responsive designs. In this case, it makes sense to use a HTML/CSS/JS template. Similarly, if you’re trying to teach the basics of computer science and data structures, Python 3.8 might be a good choice.
Step 4 – Setup
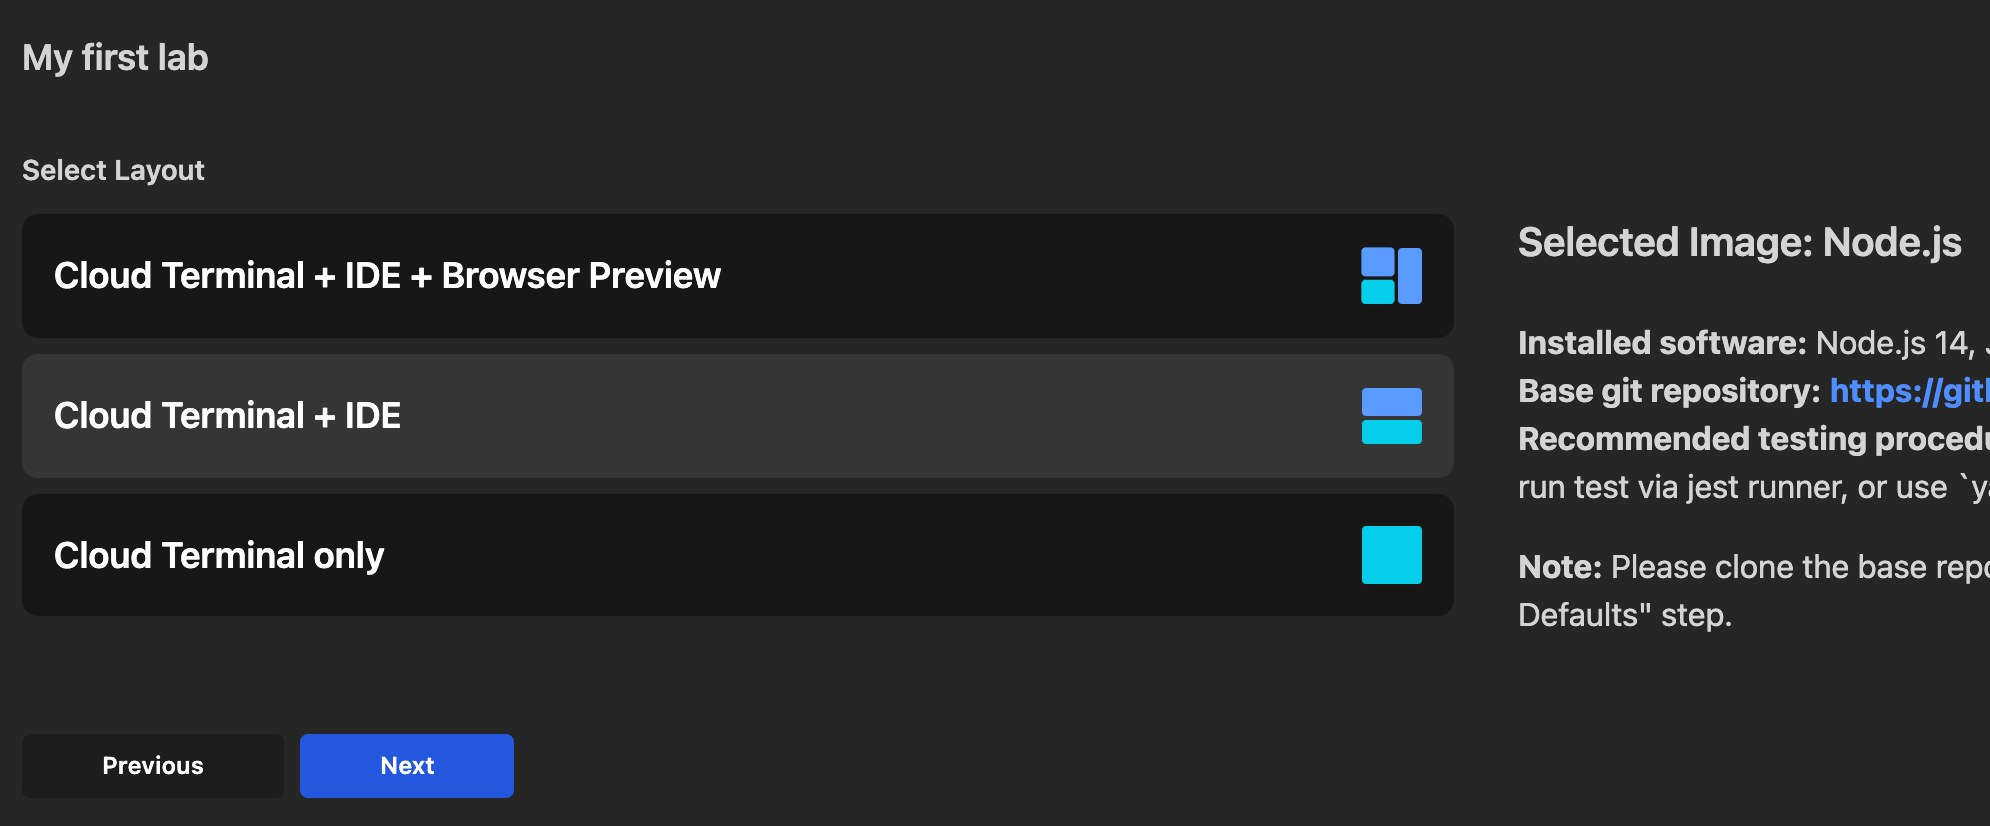
The setup page would show you how the lab UI appears to the user. We support 3 UIs for now:

- Cloud Terminal + IDE + Browser – Use this for web-related labs where you want the middle IDE and the browser preview (embedded as iframe) on the right. Note that when you choose this option, any server listening on port 1337 on the server would be visible on the output on the right. For example, if you have a Node.js app serving ./index.HTML on / route on port 1337, it would automatically show up the moment the lab interface loads completely.
- Cloud Terminal + IDE – Use this when you want the IDE and terminal but not the web preview
- Cloud Terminal only – Use this when you only want the user to use the terminal (bash shell). This is suited for labs where you require the user to only perform certain actions using CLI, like creating a folder or using git.
Once you set the mode, you’re ready to go to the next step.
Step 5 – Lab Defaults

Lab defaults allow you to configure what files are present when the user loads the lab page. When you select a “template”, we could populate the lab interface with the required software installed (like Node.js, snowpack, etc.) but we need you to provide a starting point for the user.
The default repository combined with the branch name in Specify Branch field should be a link to a public GitHub repository. This repository (and that branch) would be cloned into the working playground. For example, if I give a react-birthday-project repo link (https://github.com/codedamn-classrooms/react-birthday-project/tree/lab1), the cloned files I’ll see here would be of that repository:

The complete repo is cloned and made available to the user.
Note: Override first command and default open tabs options are deprecated (and replaced with a .cdmrc config file). More on .cdmrc file later.
Override the first command allows you to override the command that runs just after your GitHub repo is cloned. For example, in the case of the HTML/CSS/JS template, we start a static server right after cloning the repo. If you’d like to customize that behaviour you can write a one-liner bash script there. In most cases, you would not need to modify it.
Default open tabs – This is a comma-separated name of files (relative path from your GitHub repository) of files that should automatically get opened when a user tries to attempt the lab. This is a UX feature to help your users get started with a challenge quickly.
Step 6, 7 – Compile and Test + Challenges
This section would be relevant once you create the lab. Therefore, for now, you can simply click on the Next button to finalize the lab and hit Create Lab on the last step.
Once you create the lab, you’ll see the URL changes to a permanent URL for the lab in the form /edit-lab/<some hash>
Now you can go to Compile and Test section. Here you will see 3 parts:
- Compile command
- Test command
- Test File (Edit button)
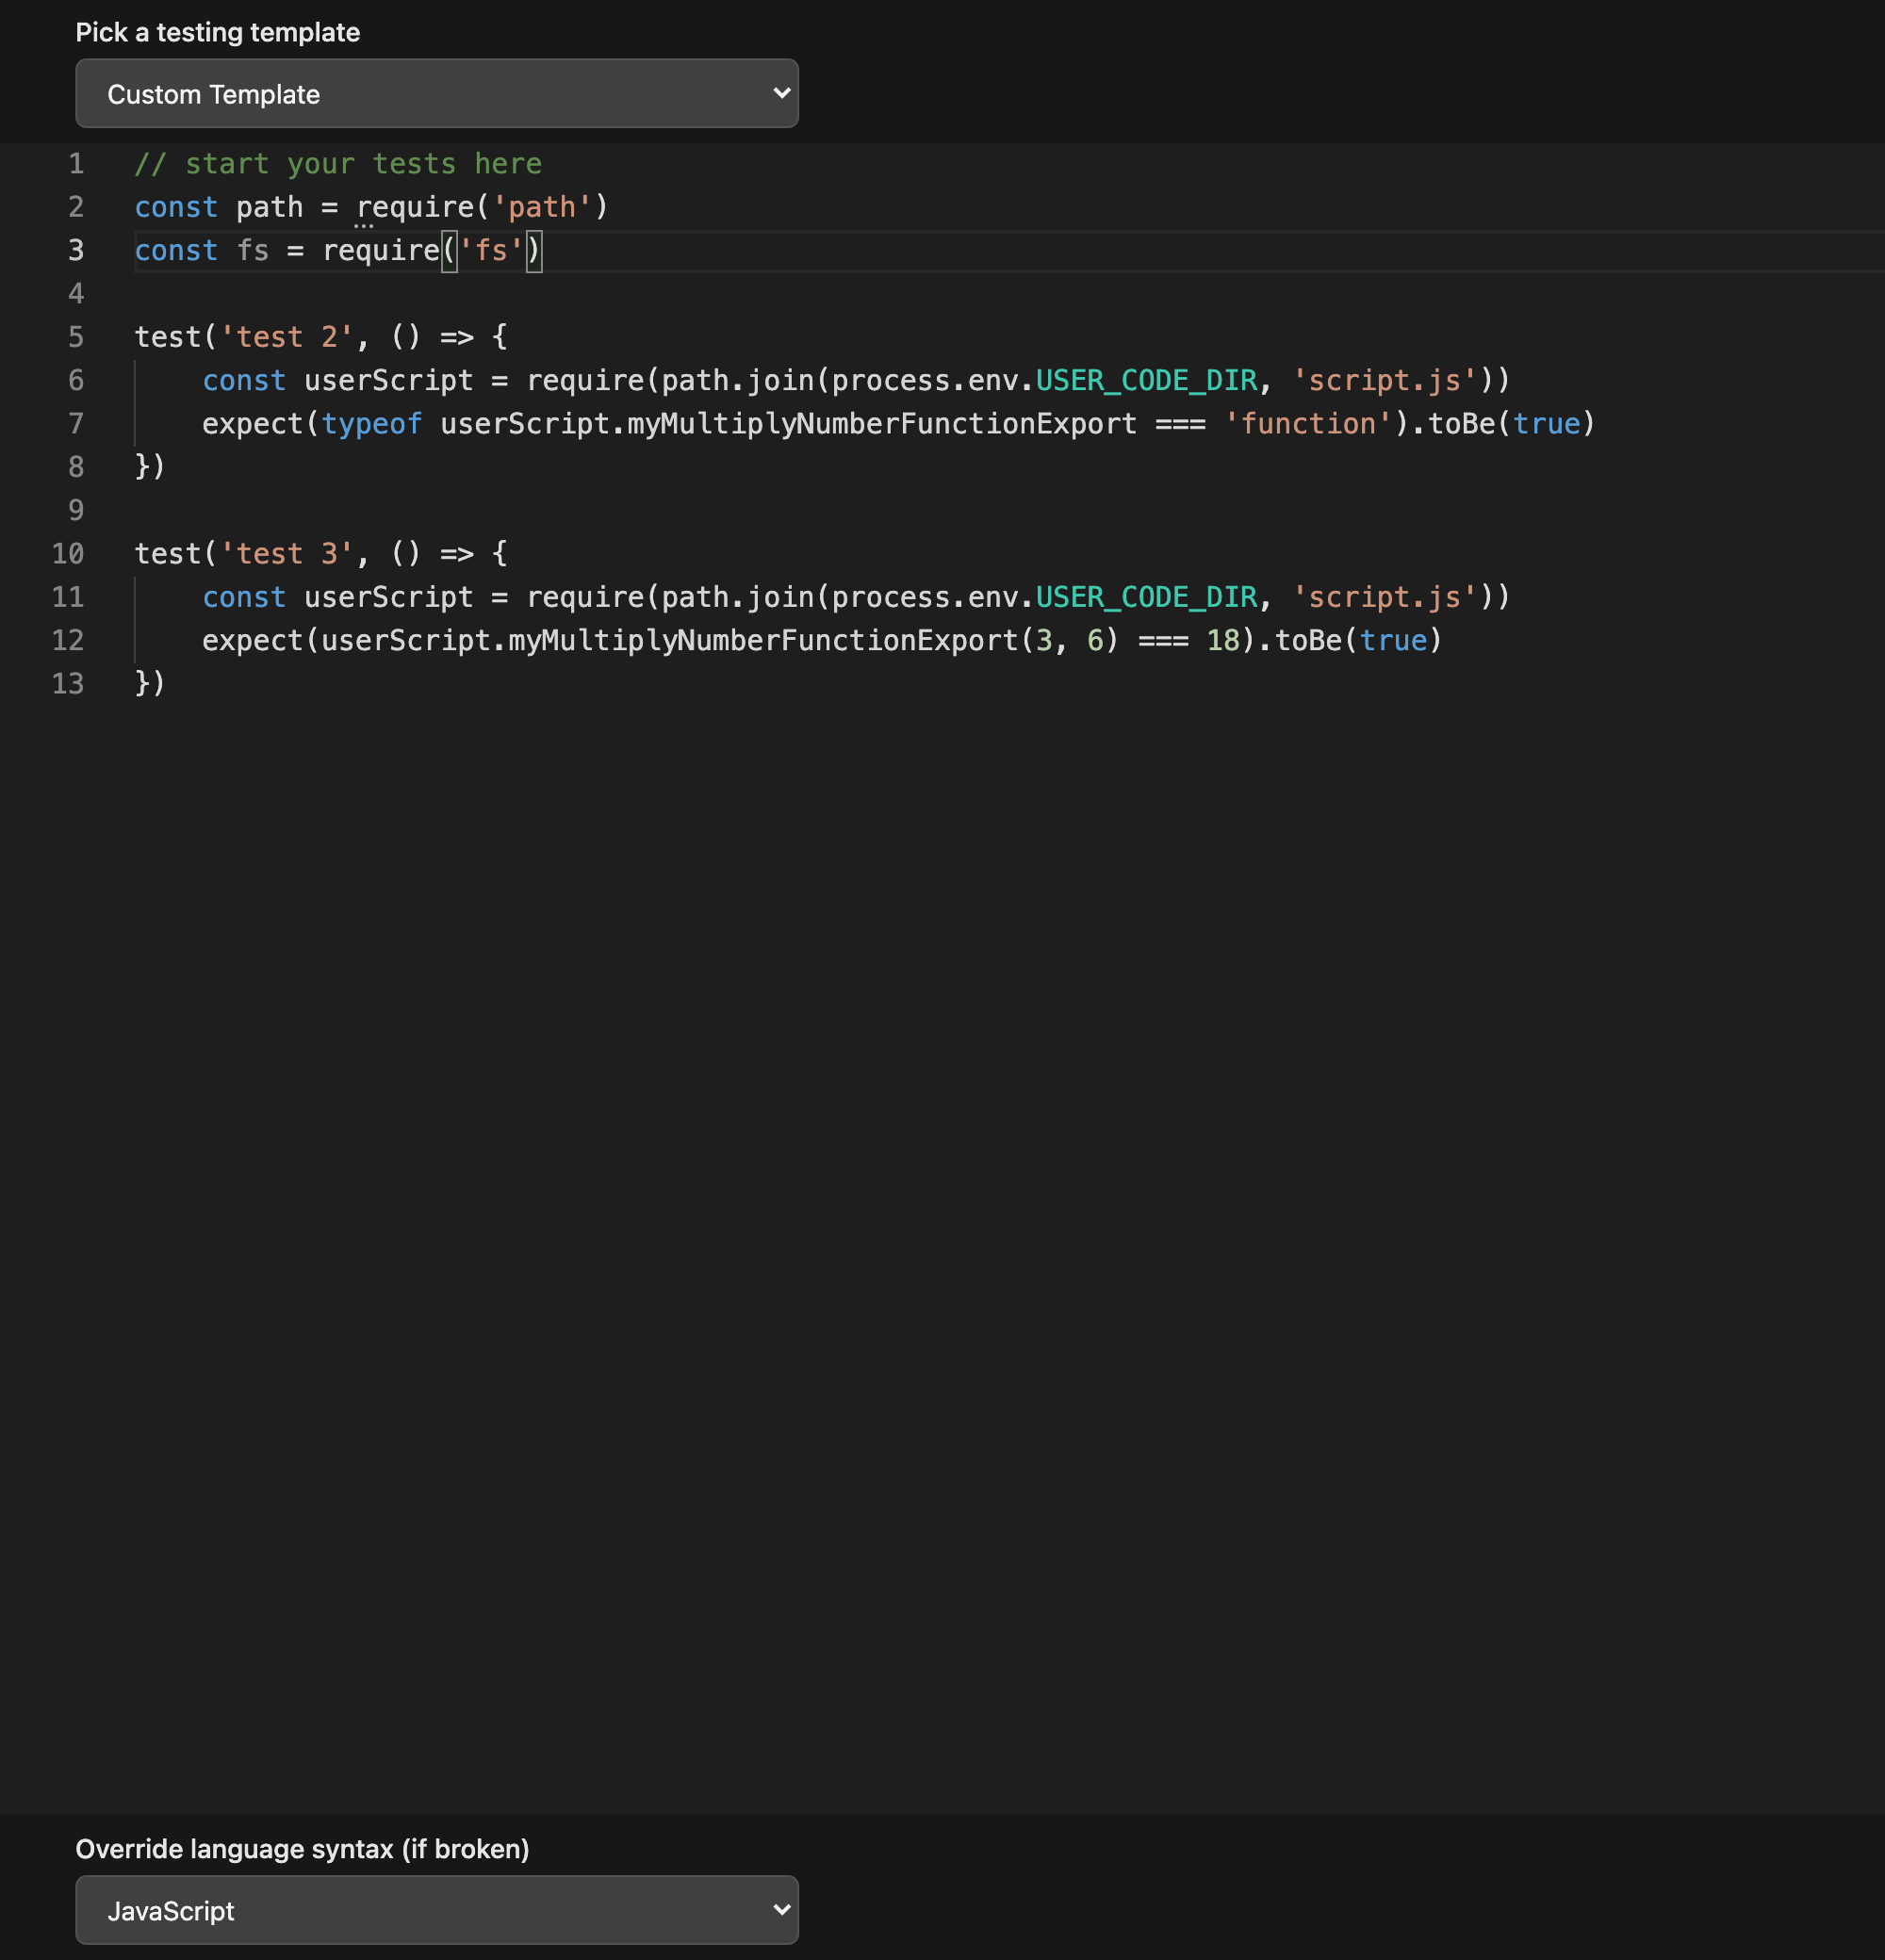
When you click on the “Edit” button, you can see a new window opened where you write your test cases:

Pick a testing template
This dropdown will allow you to select one of many pre-defined testing templates for your use case. For example, if you’re writing a lab for Python, you may use pytest for it. To make it work, you need the following:
- Select Python (pytest) template from the dropdown
- Import any relevant user code (`sys.path.append` automatically adds it to the path)
- Write test using pytest

- Save the file
- Note that here every test result corresponds to a challenge output. If your test passes, then the challenge becomes green otherwise it stays red.

(Optional information) Available environment variables:
When the user runs the test, the following environment variables are always available to you in bash script (compile/test commands) and inside your test file:
- USER_CODE_DIR – this is the directory path of the user’s code. Use it to import/run user-specific code if you want.
- PUBLIC_PORT is the publicly accessible port on localhost for the user’s server. As of now, this is 1337. Use it to perform HTTP requests to the user server
- UNIT_TEST_OUTPUT_FILE is the name of the file where results of tests should be put in. After your test file is executed, it should output a boolean array (ex – [true, false, true]) in this file. Note: This is only required when you’re writing a test file from scratch without any test runner like jest or pytest.
Once someone hits the Run Tests button on a lab, the following things happen in order (this is only for your understanding purposes – no need to think about this every time while creating a lab):
- The Compile command is executed. This command is optional and only required for languages that require a relatively long compilation phase.
- A test file is downloaded on the cloud machine.
- A command is executed on the cloud machine which runs this test file either directly (
node <your test file>or using a runneryarn test:jest). You can specify this behaviour inside the Test Command input field. The best default would always be set for you. - Finally, once the command executes successfully, the backend server tries to read a boolean JSON array from a file inside
$UNIT_TEST_OUTPUT_FILEthe environment variable. - Once the test file runs successfully, we map the results written in
UNIT_TEST_OUTPUT_FILEto the challenged order on the screen.
For example, if finally the file inside the env variable $UNIT_TEST_OUTPUT_FILE is [true, false, false], the status of the challenges would be:
Your code should include <!doctype html> - PASS (GREEN)
There should be one HTML tag - FAIL (RED)
The HTML tags should wrap around one h1 element - FAIL (RED)- You add these Challenges that the user sees on the frontend from the Challenges tab

Save the lab and you’re done. To test this lab, simply hit the Test Lab button after saving the lab. Once your lab is ready, you can link it from the curriculum page, and your interactive lab is now ready to be distributed globally to millions of developers.
Chapter 1: Introduction to codedamn creator panel
Chapter 2: Getting started with your first interactive course
Chapter 3 (currently reading): Building an interactive lab course item
Sharing is caring
Did you like what Mehul Mohan wrote? Thank them for their work by sharing it on social media.
No comments so far
Curious about this topic? Continue your journey with these coding courses: